Authentication with FT4 accounts
Authentication in dapps is essential for verifying if a user has permission to perform specific actions. While the
process is straightforward with regular Rell applications, it becomes more complex with FT4 due to support for native
and EVM signatures and multiple keys for an FT4 account. However, the complexity is abstracted, and authentication can
be easily implemented using the authenticate operation.
The authenticate function
To authenticate a user within an operation, use the following code:
operation foo() {
    val account = auth.authenticate();
}
However, calling this operation from the client side without additional configuration will result in an error:
await session.call(op("foo"));
// Cannot find auth handler for operation <foo>
To enable FT4 authentication, define an auth handler for the operation using the auth_handler extension function. This
function allows you to specify the authentication requirements for the operation, such as required auth flags or custom
authentication logic. For more information on extendable functions, refer to the
extendable functions topic.
@extend(auth.auth_handler)
function () = auth.add_auth_handler(
  scope = rell.meta(foo).mount_name,
  flags = []
);

operation foo() {
    val account = auth.authenticate();
}
In this example, the auth_handler function is defined with an empty list of flags, indicating that no specific auth
flags are required to call the foo operation. The scope parameter specifies the scope of the auth handler, which in
this case is limited to the foo operation.
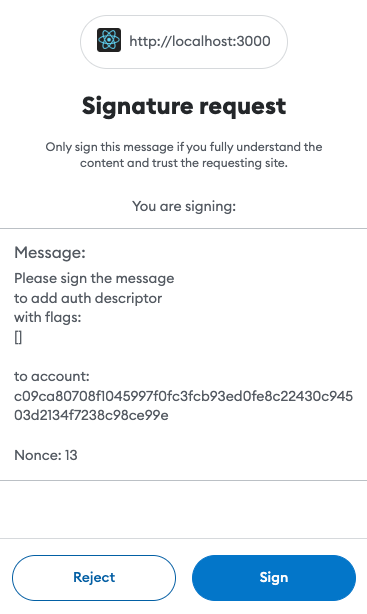
If you are building a web application, when the operation is called, the user will be prompted to sign it in the MetaMask window.
Overridable auth handlers
Sometimes, when you define an auth handler for an operation, for example, if you are developing your library on top of
FT4, you should allow developers to override that auth handler with their implementation, which suits their use case
better. For that, we provide an alternative function for registering an auth handler called
add_overridable_auth_handler, which works precisely like add_auth_handler with the only difference that it allows
your user to call add_auth_handler with the same scope as was registered with the overridable auth handler, something
that would cause an error if you would have used add_auth_handler.
@extend(auth.auth_handler)
function () = auth.add_overridable_auth_handler(
  scope = rell.meta(foo).mount_name,
  flags = []
);

@extend(auth.auth_handler)
function () = auth.add_auth_handler(
  scope = rell.meta(foo).mount_name,
  flags = ["T"]
);
If the user adds their version of an auth handler, it will authorize the operation; if they don't, your version will be used.
While add_overridable_auth_handler allows the user to add another auth handler with the same name, it only works once.
For example, if you override auth handlers for one of the built-in FT4 auth handlers, your users cannot override that
auth handler again.
Custom auth messages
In the previous example, the message lacks details about argument names. The message is automatically generated from the
operation name and argument values. To show friendlier messages, define a custom message formatter. The following
example demonstrates how to create a custom message formatter for the bar operation:
function bar_message(gtv) {
    val args = struct<bar>.from_gtv(gtv);
    val arg1 = args.arg1;
    val arg2 = args.arg2;
    return "Please sign the message\nin order to call BAR operation\nwith arguments:\n\n- arg1: %s\n- arg2: %s".format(arg1, arg2);
}

@extend(auth.auth_handler)
function () = auth.add_auth_handler(
  scope = rell.meta(bar).mount_name,
  flags = [],
  message = bar_message(*)
);

operation bar(arg1: text, arg2: integer) {
    val account = auth.authenticate();
}
The custom message formatter bar_message expects one parameter: a GTV-encoded list of operation arguments. The
operation arguments can be easily decoded using struct<op_name>.from_gtv(gtv). In this case, the arguments for the
bar operation are decoded using struct<bar>.from_gtv(gtv).
Our custom message formatter now also displays argument names. Please note that the message will be decorated to contain the blockchain rid of the current blockchain and a nonce value to prevent replay attacks.
To apply the custom message formatter, specify it in the auth handler definition:
@extend(auth.auth_handler)
function () = auth.add_auth_handler(
  scope = rell.meta(bar).mount_name,
  flags = [],
  message = bar_message(*)
);
Custom resolver
When your authentication requirements are more complex, static flags cannot determine whether a user can act. For
example, in the FT4 library, the ft4.delete_auth_descriptor operation requires the A flag unless the auth descriptor
to be deleted is the same as the one authorizing the operation. In that case, it can have any flags.
To handle such scenarios, pass a resolver function:
function bar_resolver(
  args: gtv,
  account_id: byte_array,
  auth_descriptor_ids: list<byte_array>
): byte_array? {
    // Only the main auth descriptor for the account can perform this operation
    for (ad_id in auth_descriptor_ids) {
        val main_ad_id = accounts.main_auth_descriptor @ {
            .account.id == account_id
        } .auth_descriptor.id;
        return if (main_ad_id in auth_descriptor_ids) main_ad_id else null;
    }

    return null;
}

@extend(auth.auth_handler)
function () = auth.add_auth_handler(
  scope = rell.meta(bar).mount_name,
  flags = [],
  message = bar_message(*),
  resolver = bar_resolver(*)
);
The resolver function accepts the following arguments:
args: The arguments passed to thebaroperation, similar to howargsis passed to the message function.account_id: The account targeted for authentication.auth_descriptor_ids: A list of possible auth descriptors for authenticating this operation.
The return type of this function is byte_array?. The returned value should be one of the auth descriptor IDs passed as
input. The first auth descriptor that satisfies the auth requirements will be used. If the list does not contain any
auth descriptors that fulfill the requirements, the function must return null, causing the authenticate() call to
fail with a permission error.
Application scope auth handler
Often, multiple operations within an application share the same authentication requirements (e.g., auth flags). In such
cases, define an application scope auth handler. If the scope property is omitted when defining an auth handler, it
becomes an application scope handler and is used for operations without operation scope auth handlers.
module;

import lib.ft4.accounts;
import lib.ft4.auth;

query get_all_accounts() = accounts.account @* {} (.id);

@extend(auth.auth_handler)
function () = auth.add_auth_handler(
  flags = []
);

operation foo() {
    val account = accounts.authenticate();
}

operation bar(arg1: text, arg2: integer) {
    val account = accounts.authenticate();
}
In this example, the auth_handler function becomes the application scope auth handler without a scope definition. It
is used for the foo and bar operations because they need their operation scope auth handlers.
You can't define multiple application scope auth handlers, as it would result in a runtime error during authentication.
Mount name scope auth handler
Apart from operation and application scope auth handlers, there is also a mount name scope auth handler. This allows the use of a common auth handler for a mount name.
For example, suppose you have this folder structure in your project:
src/
|-dir1/
| |-dir2/
| | |-inner.rell
| |
| |-mid.rell
|
|-outer.rell
Suppose that inner.rell defines operations foo and bar. mid.rell imports inner.rell, and outer.rell imports
mid.rell. In this example, outer is the entry point of the dapp. This would be the code:
@mount("mid.inner")
module;

operation foo() {
    // ...
}

operation bar() {
    // ...
}
@mount("mid")
module;
import dir2.inner;
module;
import dir1.mid;
blockchains:
  hello:
    module: outer
#...
The operations are now mounted as mid.inner.foo and mid.inner.bar.
You can define an auth handler for all operations mounted in scope inner by doing so:
@extend(auth.auth_handler)
function () = auth.add_auth_handler(
  scope = "mid.inner",
  flags = ["T"]
);
The code above means that both foo and bar need the T flag to be called.
You could also define it with scope = "mid", which would also cover all operations contained in mid.rell.
If you define a mount name scope for two different mount names, the most specific one will be used. For example, suppose you define:
- auth handler "A" for scope
one.two; - auth handler "T" for scope
one.two.three.four.
These operations will need the A flag to be called:
one.two.fooone.two.three.fooone.two.other.modules.foo
These operations will need the T flag to be called:
one.two.three.four.fooone.two.three.four.other.modules.foo
Detailed information about mount name scope auth handlers will be added later, including support for {operation} and
{args} placeholders in the auth message template.
Disposable keys and login management
To improve the user experience in web applications, FT4 provides a mechanism for generating disposable keys and adding them to a user's account. This allows non-interactive signing of operations using the directly accessible new key, eliminating the need for the user to sign each operation with MetaMask.
However, it's crucial to exercise caution when adding auth flags to disposable keys, as compromised keys with sensitive flags could lead to asset compromise or other security risks.
FT4 offers a login function that simplifies the process of generating and managing disposable keys.
Logging in
The following example demonstrates adding a disposable key to an account using the login function and calling the
foo and bar operations. This time, only one message signing is required to add a new auth descriptor, while the
foo and bar operations are called without signing.
createWeb3ProviderEvmKeyStore(window.ethereum).then(async (store: EvmKeyStore) => {
  const { getAccounts, login } = createKeyStoreInteractor(client, store);

  const accounts = await getAccounts();

  if (!accounts.length) return;

  const { session, logout } = await login({
    accountId: accounts[0].id,
  });

  await session.call(op("foo"), op("bar", "some other text", 123456));

  // more calls here ...

  await logout();
});
However, the disposable auth descriptor will still require a signature if a transfer operation is called because it doesn't have the "T" (transfer) flag.
To sign the transfer transaction using the disposable auth descriptor, modify the login function call and add the "T" flag
to the auth descriptor:
const { session, logout } = await login({
  accountId: accounts[0].id,
  config: {
    flags: ["T"],
  },
});
The disposable auth descriptor will be used to sign the transfer transaction instead of the master auth descriptor.
If we want, we can also specify a keystore when logging in which then will hold the signing key that will be used with the disposable auth descriptor. It is a good idea to always specify a keystore as it gives increased control over the lifecycle of the disposable key. If no keystore is provided, the disposable key will only be stored in memory and will thus be cleared when the browser window is reloaded. Forcing the user to login on each page reload can lead to bad UX.
Furthermore, using an in memory key store while developing could be problematic since each page reload will cause a new disposable auth descriptor to be added. In a development scenario, where each code change might trigger a hot reload of the page, one will quickly hit the upper limit of how many auth descriptors can be added, resulting in the inability of logging in to the account until the login time to live is reached.
To use a more durable keystore, we can specify it when logging in:
const { session } = await login({
  accountId: accounts[0].id,
  config: {
    flags: ["T"],
  },
  createSessionStorageLoginKeyStore(),
})
This will instead store the disposable key in the browsers session storage and consequently have the same lifecycle. Out
of the box, there is also a variant that will store the key in the browsers local storage. The login function accepts
any instance of the LoginKeystore
interface which means that it is possible to implement a custom login keystore, e.g., for cases when the dApp does not
run in a browser context.
One can also add rules to be applied to the new auth descriptor, such as for how long it should be valid:
const { session } = await login({
  accountId: accounts[0].id,
  config: {
    flags: ["T"],
    rules: ttlLoginRule(minutes(30)),
  },
  createSessionStorageLoginKeyStore(),
});
If no login config is provided. The default config will be used. The default timeout is then one day and the flags
will be set to [].
Disposable keys aren't securely stored. Therefore, never add auth flags that could lead to asset compromise if the disposable key pair is compromised.
Logging out
Logging out is a necessary step after login which removes the disposable key's access to the account, removing the risk
of misuse in case that key is leaked. To do so, you simply have to call the logout function:
const { session, logout } = await login({
  accountId: accounts[0].id,
});

// use the disposable key...

await logout();
There are two main reasons to logout:
- the disposable key might be leaked and used to access the account by third parties, in a way that is comparable to authentication token stealing in web2;
- every account has a limit to how many auth descriptor can be attached to it, and failing to remove old unused ones brings the account closer to this limit. Reaching the maximum number of auth descriptors added to the account will prevent the user from logging in again until some auth descriptors expire.
For these reasons, always remember to call the logout function to destroy disposable keys when they are no longer
needed.
If you want the better UX given by being able to login without user interaction, you can use a more durable login
keystore when logging in (like createSessionStorageLoginKeyStore()). This can also help reduce the risk of being
locked out from the account during development.
A more durable keystore will prevent the buildup of unusable auth descriptors on the account.
For more information on the maximum auth descriptor limit, check out the Auth descriptors and access control topic.